The QuickBooks software has a tool named Auto Data Recovery (ADR), this ADR tool is quite useful at times of data corruption. The feature of this astonishing tool is that it has the ability to restore almost 100% of your lost data. All of your QBs data is safe and quite secure just because of this tremendous tool.
This tool was first developed in Quickbooks Premier and Quickbooks Pro. In 2012, QuickBooks 2012 auto data recovery named version was introduced into the Quickbooks Software Enterprise version. Many times, intuit data services can do data recovery. However, this method takes it slowly and means that you cannot use QuickBooks for a longer period of time. Using the ADR is found to be a quicker method of lost and corrupted information. We do recommend trying out the solution of data recovery included in this article.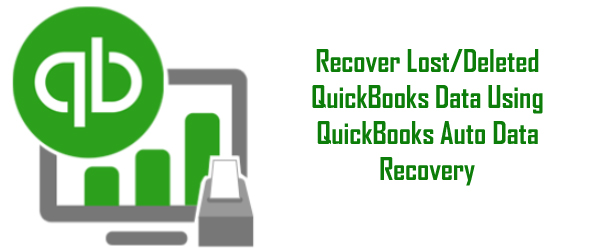
Two Ways for Recovering the Data via Quickbooks Auto Data Recovery
- You can get the lost transactions with the assistance of the current Transaction Log file (TLG) and a copy of your QBs Company file.
- Want to retrieve everything but the last hours of your transactions. This can also be carried out via a copy of both your QBs Company file and your Transaction Log file (TLG).
Things to be Kept in Mind Before Performing Auto Data Recovery
The Quickbooks Auto Data Recovery is only available in Quickbooks Premier, Pro, and Enterprise versions.
- You cannot make use of the data recovery tool in the accountant editions.
- The limit of the file size is up to 1.5 GB.
- You must be working on the latest released version of Quickbooks.
How to retrieve Data via Auto Data Recovery QuickBooks?
Method 1: Use of the Original File .TLG with .QBW.adr File
You can use the initial dealing TLG Logfile along with the ADR version of the corporate files for recovering all the recently made transactions.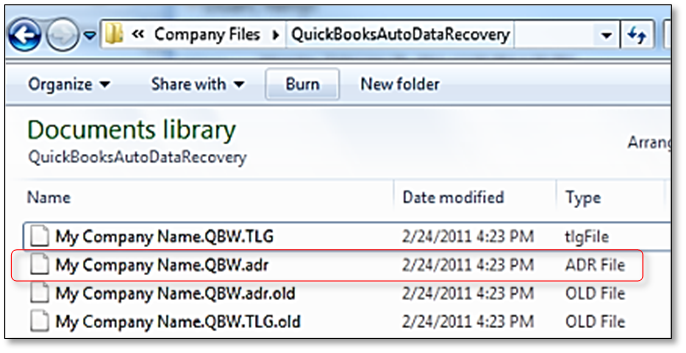
- Firstly, create a new folder on your system with the name QBTest.
- Access the folder where the corporate files are stored.
- Search for the .tlg file in your company file’s directory folder. It will have the exact similar name as your company file.
Show file extensions
If you are unable to find the .tlg file, then you will need to do the steps given below to show file extensions.
- Firstly, you need to hold Windows+E on the keyboard and open File Explorer.
- Now, select Organize and then the Folder and search option.
- For Windows 8, 8.1, & 10, you need to choose View and then the Filename extension.
- Hit on Hide extensions for file types.
- Select Apply and then OK.
- Access the QuickBooksAutoDataRecovery folder. It is under a similar location as your company files.
- Copy the file .QBW.adr and paste it into the folder QBTest. You should currently have a .QBW.adr and .tlg file on your folder of QBTest.
- Within the QBTest folder, do a right-click on the .QBW.adr and choose Rename.
- Remove .adr from the top of the file.
- Access QuickBooks.
- Open the corporate file stored in your QBTest folder. Use your account register for verifying all transactions square measure there.
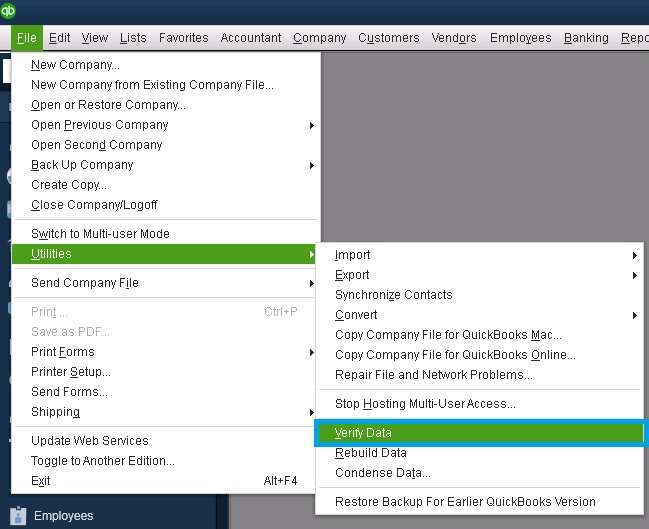
- Choose File and then Utilities, and then go to Verify Data for checking the information under the recovered file.
- If this copy of the company file is good, you will be able to transfer the broken company file to a specified location and move the copy from QBTest to the original directory location.
Also Find, Quick Ways To Resolve Quickbooks .Net Framework Error
Method 2: Retrieve the Recent Transactions Using .QBW.adr and .TLG.adr files
- Firstly, create a new folder on your system with the name QBTest.
- Access the folder where the corporate files are stored.
- Search for the TLG.adr and .QBW.adr files in your company file’s directory folder. It will have the exact similar name as your company file.
- If you can’t search for the .TLG.adr and .QBW.adr files, do these steps to indicate file extensions.
- Firstly, you need to hold Windows+E on the keyboard and open File Explorer.
- Now, select Organize and then the Folder and search option.
- For Windows 8, 8.1, & 10, you need to choose View and then the Filename extension.
- Hit on Hide extensions for file types.
- Select Apply and then OK.
- Copy the files .TLG.adr and .QBW.adr and paste into the folder QBTest.
- In your folder QBTest, delete the .adr from the top of the file name. That will provide you with files .qbw and .tlg on your folder QBTest.
- Access QuickBooks.
- Open the corporate file stored in your QBTest folder. Use your account register for verifying all transactions square measure there.
- Choose File and then Utilities, and then go to Verify Data for checking the information under the recovered file.
- If this copy of the company file is good, you will be able to transfer the broken company file to a specified location and move the copy from QBTest to the original directory location.
Conclusion
In this post, we have provided information related to QuickBooks Auto data recovery files and we hope you have found the data that you have been looking for. To get other QuickBooks-related information, do read out our other articles.